基于 android 2.3.3_r1 代码研究
我们在 activity 中加载布局文件通常使用如下方法:
1
2
3
4
5
6
7
8
9
10
11
12
13
14
15
16
17
18
19
20
21
22
23
24
25
26
27
28
29
30
31
32
/**
 * Set the activity content from a layout resource.  The resource will be
 * inflated, adding all top-level views to the activity.
 *
 * @param layoutResID Resource ID to be inflated.
 */
public void setContentView(int layoutResID) {
    getWindow().setContentView(layoutResID);
}

/**
 * Set the activity content to an explicit view.  This view is placed
 * directly into the activity's view hierarchy.  It can itself be a complex
 * view hierarhcy.
 *
 * @param view The desired content to display.
 */
public void setContentView(View view) {
    getWindow().setContentView(view);
}

/**
 * Set the activity content to an explicit view.  This view is placed
 * directly into the activity's view hierarchy.  It can itself be a complex
 * view hierarhcy.
 *
 * @param view The desired content to display.
 * @param params Layout parameters for the view.
 */
public void setContentView(View view, ViewGroup.LayoutParams params) {
    getWindow().setContentView(view, params);
}
不管使用上面哪个方法,最终都需要使用 LayoutInflater 将 xml 定义的 layout 布局文件解析为 View 对象。
下面我们就来把LayoutInflater的工作流程仔细地剖析一遍。
一、获取 LayoutInflater 实例
先来看一下LayoutInflater的基本用法吧,它的用法非常简单,首先需要获取到LayoutInflater的实例,有两种方法可以获取到:
LayoutInflater inflater = (LayoutInflater) context.getSystemService(Context.LAYOUT_INFLATER_SERVICE);

LayoutInflater inflater = LayoutInflater.from(context);
查看源码可知两种方法本质其实是一致的:
1
2
3
4
5
6
7
8
public static LayoutInflater from(Context context) {
    LayoutInflater LayoutInflater =
            (LayoutInflater) context.getSystemService(Context.LAYOUT_INFLATER_SERVICE);
    if (LayoutInflater == null) {
        throw new AssertionError("LayoutInflater not found.");
    }
    return LayoutInflater;
}
二、使用 LayoutInflater 加载布局
得到了LayoutInflater的实例之后就可以调用它的inflate()方法来加载布局了:
layoutInflater.inflate(resourceId, root);inflate 方法一般接收两个参数,第一个参数就是要加载的布局 id;第二个参数为父 view,可将当前 view 添加到父 view 中;如果不需要就直接传null。这样就成功成功创建了一个布局的实例,之后再将它添加到指定的位置就可以显示出来了。
下面我们就通过一个非常简单的小例子,来更加直观地看一下LayoutInflater的用法。如下,MainActivity对应的布局文件为 activity_main.xml:
1
2
3
4
5
<LinearLayout xmlns:android="http://schemas.android.com/apk/res/android"
    android:id="@+id/main_layout"
    android:layout_width="match_parent"
    android:layout_height="match_parent" >
</LinearLayout>
这个布局文件的内容非常简单,只有一个空的LinearLayout,里面什么控件都没有,因此界面上应该不会显示任何东西。 那么接下来我们再定义一个布局文件,给它取名为 button.xml,代码如下所示:
1
2
3
4
5
6
<Button xmlns:android="http://schemas.android.com/apk/res/android"
    android:id="@+id/btn"
    android:layout_width="200dp"
    android:layout_height="100dp"
    android:text="Button" >
</Button>
这个布局文件也非常简单,只有一个按钮。现在我们要将button_layout这个布局添加到主布局文件的LinearLayout中。MainActivity中的代码如下:
1
2
3
4
5
6
7
8
9
10
11
12
13
14
15
public class MainActivity extends Activity {

    @Override
    protected void onCreate(Bundle savedInstanceState) {
        super.onCreate(savedInstanceState);
        setContentView(R.layout.activity_main);

        final LinearLayout parent = (LinearLayout) findViewById(R.id.main_layout);

        final LayoutInflater layoutInflater = LayoutInflater.from(this);
        final View child = layoutInflater.inflate(R.layout.button_layout, null);

        parent.addView(child);
    }
}
可以看到,这里先是获取到了LayoutInflater的实例,然后调用它的inflate()方法来加载button_layout这个布局,最后调用LinearLayout的addView()方法将它添加到LinearLayout中。 现在可以运行一下程序,结果如下图所示:
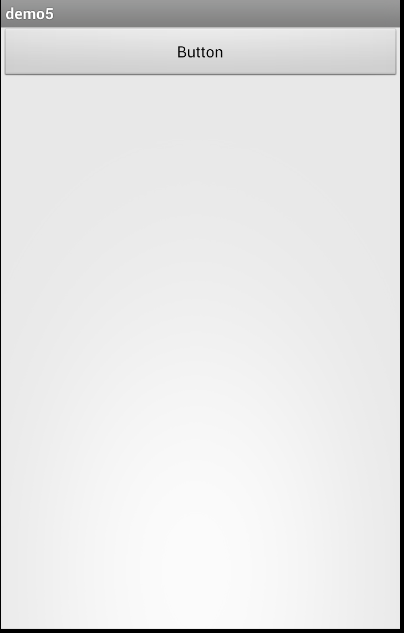
Button 在界面上显示出来了!说明我们确实是借助 LayoutInflater 成功将 button.xml 这个布局添加到 LinearLayout 中了。但是 Button 的尺寸却不是我们想要的尺寸。下面从源代码分析其原因:
三、源码分析
当然,仅仅只是介绍了如何使用LayoutInflater显然是远远无法满足大家的求知欲的,知其然也要知其所以然,接下来我们就从源码的角度上看一看LayoutInflater到底是如何工作的。
使用 LayoutInflater 加载布局文件,最终都会调用如下方法中:
1
2
3
4
5
6
7
8
9
10
11
12
13
14
15
16
17
18
19
20
21
22
23
24
25
26
27
28
29
30
31
32
33
34
35
36
37
38
39
40
41
42
43
44
45
46
47
48
49
50
51
52
public View inflate(XmlPullParser parser, ViewGroup root, boolean attachToRoot) {
    synchronized (mConstructorArgs) {
        final AttributeSet attrs = Xml.asAttributeSet(parser);
        mConstructorArgs[0] = mContext;
        View result = root;
        try {
            int type;
            while ((type = parser.next()) != XmlPullParser.START_TAG &&
                    type != XmlPullParser.END_DOCUMENT) {
            }
            if (type != XmlPullParser.START_TAG) {
                throw new InflateException(parser.getPositionDescription()
                        + ": No start tag found!");
            }
            final String name = parser.getName();
            if (TAG_MERGE.equals(name)) {
                if (root == null || !attachToRoot) {
                    throw new InflateException("merge can be used only with a valid "
                            + "ViewGroup root and attachToRoot=true");
                }
                rInflate(parser, root, attrs);
            } else {
                View temp = createViewFromTag(name, attrs);
                ViewGroup.LayoutParams params = null;
                if (root != null) {
                    params = root.generateLayoutParams(attrs);
                    if (!attachToRoot) {
                        temp.setLayoutParams(params);
                    }
                }
                rInflate(parser, temp, attrs);
                if (root != null && attachToRoot) {
                    root.addView(temp, params);
                }
                if (root == null || !attachToRoot) {
                    result = temp;
                }
            }
        } catch (XmlPullParserException e) {
            InflateException ex = new InflateException(e.getMessage());
            ex.initCause(e);
            throw ex;
        } catch (IOException e) {
            InflateException ex = new InflateException(
                    parser.getPositionDescription()
                    + ": " + e.getMessage());
            ex.initCause(e);
            throw ex;
        }
        return result;
    }
}
从这里我们就可以清楚地看出,LayoutInflater其实就是使用Android提供的pull解析方式来解析布局文件的。pull解析方式可以网上搜一下。
我们注意看下第23行,调用了createViewFromTag()这个方法,并把节点名和参数传了进去。看到这个方法名,我们就应该能猜到,它是用于根据节点名来创建View对象的。确实如此,在createViewFromTag()方法的内部又会去调用createView()方法,然后使用反射的方式创建出View的实例并返回。
当然,这里只是创建出了一个根布局的实例而已,接下来会在第31行调用rInflate()方法来循环遍历这个根布局下的子元素,代码如下所示:
1
2
3
4
5
6
7
8
9
10
11
12
13
14
15
16
17
18
19
20
21
22
23
24
25
26
27
28
29
private void rInflate(XmlPullParser parser, View parent, final AttributeSet attrs)
        throws XmlPullParserException, IOException {
    final int depth = parser.getDepth();
    int type;
    while (((type = parser.next()) != XmlPullParser.END_TAG ||
            parser.getDepth() > depth) && type != XmlPullParser.END_DOCUMENT) {
        if (type != XmlPullParser.START_TAG) {
            continue;
        }
        final String name = parser.getName();
        if (TAG_REQUEST_FOCUS.equals(name)) {
            parseRequestFocus(parser, parent);
        } else if (TAG_INCLUDE.equals(name)) {
            if (parser.getDepth() == 0) {
                throw new InflateException("<include /> cannot be the root element");
            }
            parseInclude(parser, parent, attrs);
        } else if (TAG_MERGE.equals(name)) {
            throw new InflateException("<merge /> must be the root element");
        } else {
            final View view = createViewFromTag(name, attrs);
            final ViewGroup viewGroup = (ViewGroup) parent;
            final ViewGroup.LayoutParams params = viewGroup.generateLayoutParams(attrs);
            rInflate(parser, view, attrs);
            viewGroup.addView(view, params);
        }
    }
    parent.onFinishInflate();
}
可以看到,在第21行同样是createViewFromTag()方法来创建View的实例,然后还会在第24行递归调用rInflate()方法来查找这个View下的子元素,每次递归完成后则将这个View添加到父布局当中。
这样的话,把整个布局文件都解析完成后就形成了一个完整的DOM结构,最终会把最顶层的根布局返回,至此inflate()过程全部结束。
四、参数 root 和 attachToRoot 的作用
inflate 方法还有个接收三个参数的方法重载,结构如下:
inflate(int resource, ViewGroup root, boolean attachToRoot)参数 root 和 attachToRoot 的作用又分别是什么呢?
1. root为null
1
2
3
4
final LinearLayout parent = (LinearLayout) findViewById(R.id.main_layout);
final LayoutInflater layoutInflater = LayoutInflater.from(this);
final View child = layoutInflater.inflate(R.layout.button_layout, null, true);
parent.addView(child);
此时,attachToRoot将失去作用,和两个参数的 inflate 没有区别。child 解析结果是 id 为 R.id.btn 的 Button。第4行调用 addView 添加 child 到 parent,布局文件 button.xml 中指定的 Button 的 layout_width 和 layout_height 属性将失去作用。
我们再看下如下 inflate 方法代码:
1
2
3
4
5
6
7
8
9
10
11
12
13
14
15
16
17
18
19
20
21
22
23
24
25
26
27
28
29
30
31
32
33
34
35
36
37
38
39
40
41
42
43
44
45
46
47
48
49
50
51
52
public View inflate(XmlPullParser parser, ViewGroup root, boolean attachToRoot) {
    synchronized (mConstructorArgs) {
        final AttributeSet attrs = Xml.asAttributeSet(parser);
        mConstructorArgs[0] = mContext;
        View result = root;
        try {
            int type;
            while ((type = parser.next()) != XmlPullParser.START_TAG &&
                    type != XmlPullParser.END_DOCUMENT) {
            }
            if (type != XmlPullParser.START_TAG) {
                throw new InflateException(parser.getPositionDescription()
                        + ": No start tag found!");
            }
            final String name = parser.getName();
            if (TAG_MERGE.equals(name)) {
                if (root == null || !attachToRoot) {
                    throw new InflateException("merge can be used only with a valid "
                            + "ViewGroup root and attachToRoot=true");
                }
                rInflate(parser, root, attrs);
            } else {
                View temp = createViewFromTag(name, attrs);
                ViewGroup.LayoutParams params = null;
                if (root != null) {
                    params = root.generateLayoutParams(attrs);
                    if (!attachToRoot) {
                        temp.setLayoutParams(params);
                    }
                }
                rInflate(parser, temp, attrs);
                if (root != null && attachToRoot) {
                    root.addView(temp, params);
                }
                if (root == null || !attachToRoot) {
                    result = temp;
                }
            }
        } catch (XmlPullParserException e) {
            InflateException ex = new InflateException(e.getMessage());
            ex.initCause(e);
            throw ex;
        } catch (IOException e) {
            InflateException ex = new InflateException(
                    parser.getPositionDescription()
                    + ": " + e.getMessage());
            ex.initCause(e);
            throw ex;
        }
        return result;
    }
}
root 为 null 时,24 行处变量 params 也为 null,最终 child 的 mLayoutParams 变量也为 null。查看 addView 源码:
1
2
3
4
5
6
7
8
9
10
11
12
13
14
15
16
17
18
19
20
21
22
23
24
25
26
27
28
29
30
31
/**
 * Adds a child view. If no layout parameters are already set on the child, the
 * default parameters for this ViewGroup are set on the child.
 *
 * @param child the child view to add
 *
 * @see #generateDefaultLayoutParams()
 */
public void addView(View child) {
    addView(child, -1);
}

/**
 * Adds a child view. If no layout parameters are already set on the child, the
 * default parameters for this ViewGroup are set on the child.
 *
 * @param child the child view to add
 * @param index the position at which to add the child
 *
 * @see #generateDefaultLayoutParams()
 */
public void addView(View child, int index) {
    LayoutParams params = child.getLayoutParams();
    if (params == null) {
        params = generateDefaultLayoutParams();
        if (params == null) {
            throw new IllegalArgumentException("generateDefaultLayoutParams() cannot return null");
        }
    }
    addView(child, index, params);
}
可以看到,params 为 null 时,会调用 generateDefaultLayoutParams 给 params 赋值。再看下 LinearLayout 中 generateDefaultLayoutParams 方法的实现:
1
2
3
4
5
6
7
8
9
10
11
12
13
14
15
16
17
/**
 * Returns a set of layout parameters with a width of
 * {@link android.view.ViewGroup.LayoutParams#MATCH_PARENT}
 * and a height of {@link android.view.ViewGroup.LayoutParams#WRAP_CONTENT}
 * when the layout's orientation is {@link #VERTICAL}. When the orientation is
 * {@link #HORIZONTAL}, the width is set to {@link LayoutParams#WRAP_CONTENT}
 * and the height to {@link LayoutParams#WRAP_CONTENT}.
 */
@Override
protected LayoutParams generateDefaultLayoutParams() {
    if (mOrientation == HORIZONTAL) {
        return new LayoutParams(LayoutParams.WRAP_CONTENT, LayoutParams.WRAP_CONTENT);
    } else if (mOrientation == VERTICAL) {
        return new LayoutParams(LayoutParams.MATCH_PARENT, LayoutParams.WRAP_CONTENT);
    }
    return null;
}
这就可以看到上面 Button 尺寸不符合预期的原因了。
2. root不为null,attachToRoot设为false
1
2
3
4
final LinearLayout parent = (LinearLayout) findViewById(R.id.main_layout);
final LayoutInflater layoutInflater = LayoutInflater.from(this);
final View child = layoutInflater.inflate(R.layout.button_layout, parent, false);
parent.addView(child);
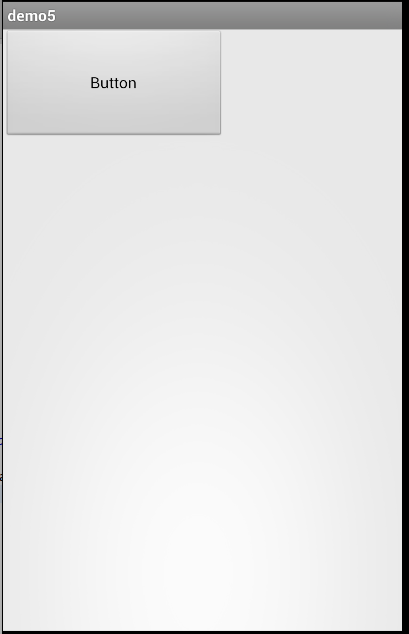
root参数只有一个用处,就是参与生成 ViewGroup.LayoutParams 类型的参数 params,这个参数在将子 view 添加到父 view 时起到确定子 view 的尺寸、子 view 在父 view 的位置的作用。我们给 button.xml 设置的 layout_width 和 layout_height 属性这个时候就会起作用了。
3. root不为null,attachToRoot设为true
1
2
3
4
final LinearLayout parent = (LinearLayout) findViewById(R.id.main_layout);
final LayoutInflater layoutInflater = LayoutInflater.from(this);
final View child = layoutInflater.inflate(R.layout.button_layout, parent, true);
// parent.addView(child); // child 已经添加到 parent,不能再调用 addView 添加到 parent
效果同两个参数的 inflate 方法。在调用 inflate 方法时,会将 button.xml 解析为 Button,然后添加到 parent 中,不需要再调用 addView 来添加。child 返回的实际就是父 view,这里就是 parent,而不再是 Button。
好了,现在对LayoutInflater的工作原理和流程也搞清楚了。
五、activity 的 view 树
修改MainActivity中的代码,如下所示:
1
2
3
4
5
6
7
8
9
10
11
12
13
14
15
16
17
public class MainActivity extends Activity {
    private LinearLayout mainLayout;

    @Override
    protected void onCreate(Bundle savedInstanceState) {
        super.onCreate(savedInstanceState);
        setContentView(R.layout.activity_main);
        mainLayout = (LinearLayout) findViewById(R.id.main_layout);

        ViewParent viewParent = mainLayout.getParent();
        Log.d("TAG", "the parent of mainLayout is " + viewParent);
        viewParent = viewParent.getParent();
        Log.d("TAG", "the parent of mainLayout's parent is " + viewParent);
        viewParent = viewParent.getParent();
        Log.d("TAG", "the parent of mainLayout's grandfather is " + viewParent);
    }
}
可以看到,这里通过findViewById()方法,拿到了activity_main布局中最外层的LinearLayout对象,然后调用它的getParent()方法获取它的父布局,再通过Log打印出来。现在重新运行一下程序,结果如下:
04-13 13:23:26.640: D/TAG(1693): the parent of mainLayout is android.widget.FrameLayout@b655edb0
04-13 13:23:26.640: D/TAG(1693): the parent of mainLayout's parent is android.widget.LinearLayout@b655dbb0
04-13 13:23:26.640: D/TAG(1693): the parent of mainLayout's grandfather is com.android.internal.policy.impl.PhoneWindow$DecorView@b655d7c0
通过 android sdk 附带的工具 hierarchy view,可以直观的看出 activity 的 view 树的层级结构:
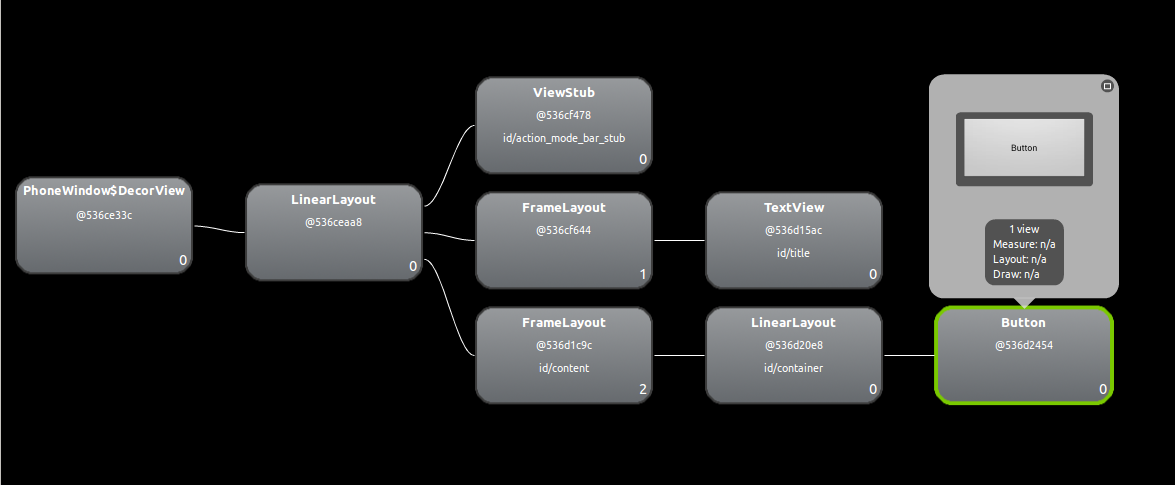
可以看到,view 树层次依次为:最顶端的PhoneWindow$DecorView -> 次层的LinearLayout -> id 为 android.R.id.content 的 FrameLayout -> main_layout.xml 中的 LinearLayout (parent) -> button.xml 中的 Button (child)。
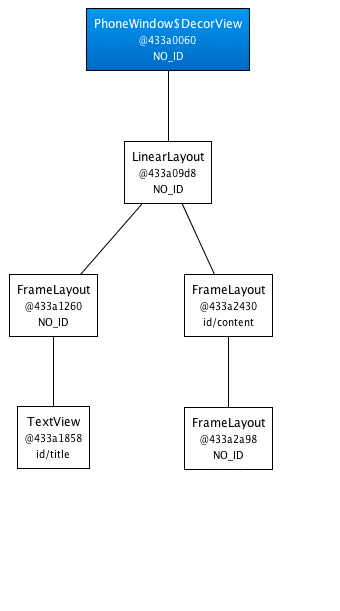
可以看到,Android界面显示的原理要比我们所看到的东西复杂得多。一个Activity中显示的界面其实主要都由两部分组成,标题栏和内容布局。标题栏就是在很多界面顶部显示的那部分内容,比如刚刚我们的那个例子当中就有标题栏。而内容布局就是一个FrameLayout,这个布局的id叫作android.R.content,我们调用setContentView()方法时所传入的布局实际添加这个FrameLayout中,这也是为什么这个方法名叫作setContentView()。
最上层的DecorView是真正保持窗口背景drawable的view。我们可以再Activity中通过如下方法来改变DectorView的背景drawable(即窗口的背景):
1
2
getWindow().setBackgroundDrawable()
getWindow().setBackgroundDrawableResource()